
准备工作

Gitalk。它是一个基于 GitHub Issue 和 Preact 开发的评论插件,除了 GitHub 账号之外不需要其他依赖,也不需要注册其他账号。

本文简要介绍一下如何在博客使用 Gitalk 评论区,并移除其他评论区的过程。对于具体的细节则不会做过多解释,主要展示步骤。

本文运行环境:

1
2
3
4
5
node: v18.16.1
npm: 9.5.1
hexo: 6.3.0
hexo-cli: 4.3.1
NexT: 8.17.0

注册 GitHub Application

使用 Gitalk 的前提是:

  1. 一个公共的 GitHub 存储库用于存储评论
  2. 创建一个 GitHub Application

其中第一步当前已经满足,你的博客本身就是你的 GitHub 公共存储库,直接使用即可。当然你也可以新建一个存储库专门用于评论区。下面完成第二步。

点击这里申请 GitHub Application,网页标题为 “Register a new OAuth application”。需要填写如下内容:

  • Application name:应用名称,我在这里填写了 blog
  • Homepage URL:你的应用主页,这里填写博客主页地址。记住要携带 https 协议,如果你的博客是个人域名,请使用域名而不是 *.github.io
  • Application description:你的应用描述,任何语言皆可。用你自己喜欢的文字描述。
  • Authorization callback URL:这里要填写当前使用插件页面的域名,与 Homepage URL 相同即可。

点击 “Register application”,在新页面可以看到 Client ID,先记下。随后在 “Client secrets” 右侧点击 “Generate a new client secret”,并记下生成的 client secret。它只会显示一次,如果没有记下或者丢失了,就只好重建新的再删除旧的了。

以上准备工作完毕。如果你需要一个存储库专门用于评论区,直接在 GitHub 新建 repository 即可,这里就不赘述了。

配置 Gitalk

_config.yml 中进行配置:

_config.next.yml

1
2
3
4
5
6
7
8
9
10
11
12
13
14
15
16
17
18
19
20
21
22
23
24
25
# Comments System (评论系统)
# 评论配置
comments:
# Up to two comments system, the first will be shown as default
# Choose: Disqus/Disqusjs/Livere/Gitalk/Valine/Waline/Utterances/Facebook Comments/Twikoo/Giscus/Remark42/Artalk
use: gitalk # Valine,Disqus
text: true # Display the comment name next to the button
# lazyload: The comment system will be load when comment element enters the browser's viewport.
# If you set it to true, the comment count will be invalid
lazyload: true
count: false # Display comment count in post's top_img
card_post_count: false # Display comment count in Home Page

# gitalk
# https://github.com/gitalk/gitalk
gitalk:
enable: true #是否开启Gitalk评论
client_id: Ov23liwBeMYsKAurz69S #生成的clientID
client_secret: *** #生成的clientSecret
repo: *** #仓库名称
owner: *** #github用户名
admin: # GitHub repo 的拥有者和合作者,这些人具有初始化 issue 的权限
- ***
distractionFreeMode: true #是否启用类似FB的阴影遮罩
labels: 'gitalk'

如果你之前有其他的评论区,记得取消掉。具体方法就是查看附近的评论区设置,如果有 enable: true 要改为 false

评论区批量初始化

现在部署之后应该可以看到 Gitalk 评论区,但是处于未初始化的状态,而且每一篇文章都是这样的。显示的文字如下:
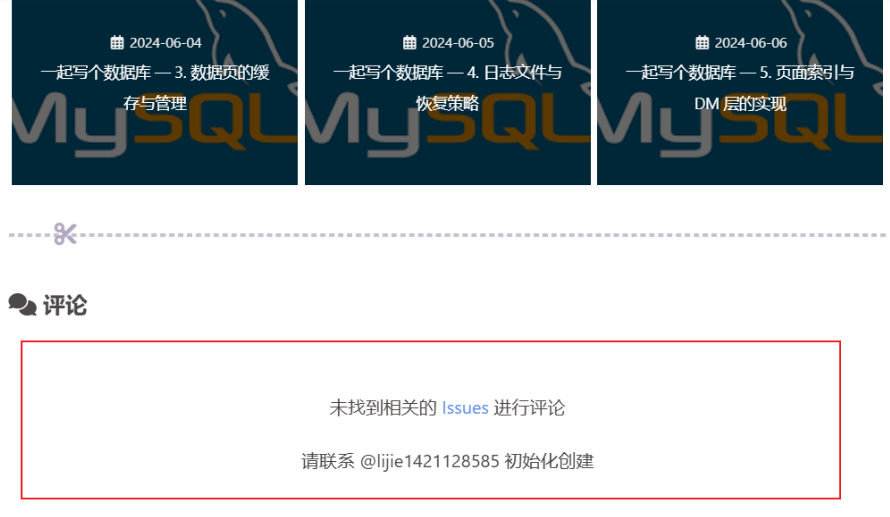
如果是全新的博客或许可以手动初始化,但是对于老博客来讲,这个成本有点高,因此需要批量初始化。本部分参考了这篇文章这篇文章,并做了一些修改与优化。

申请 Personal Access Token

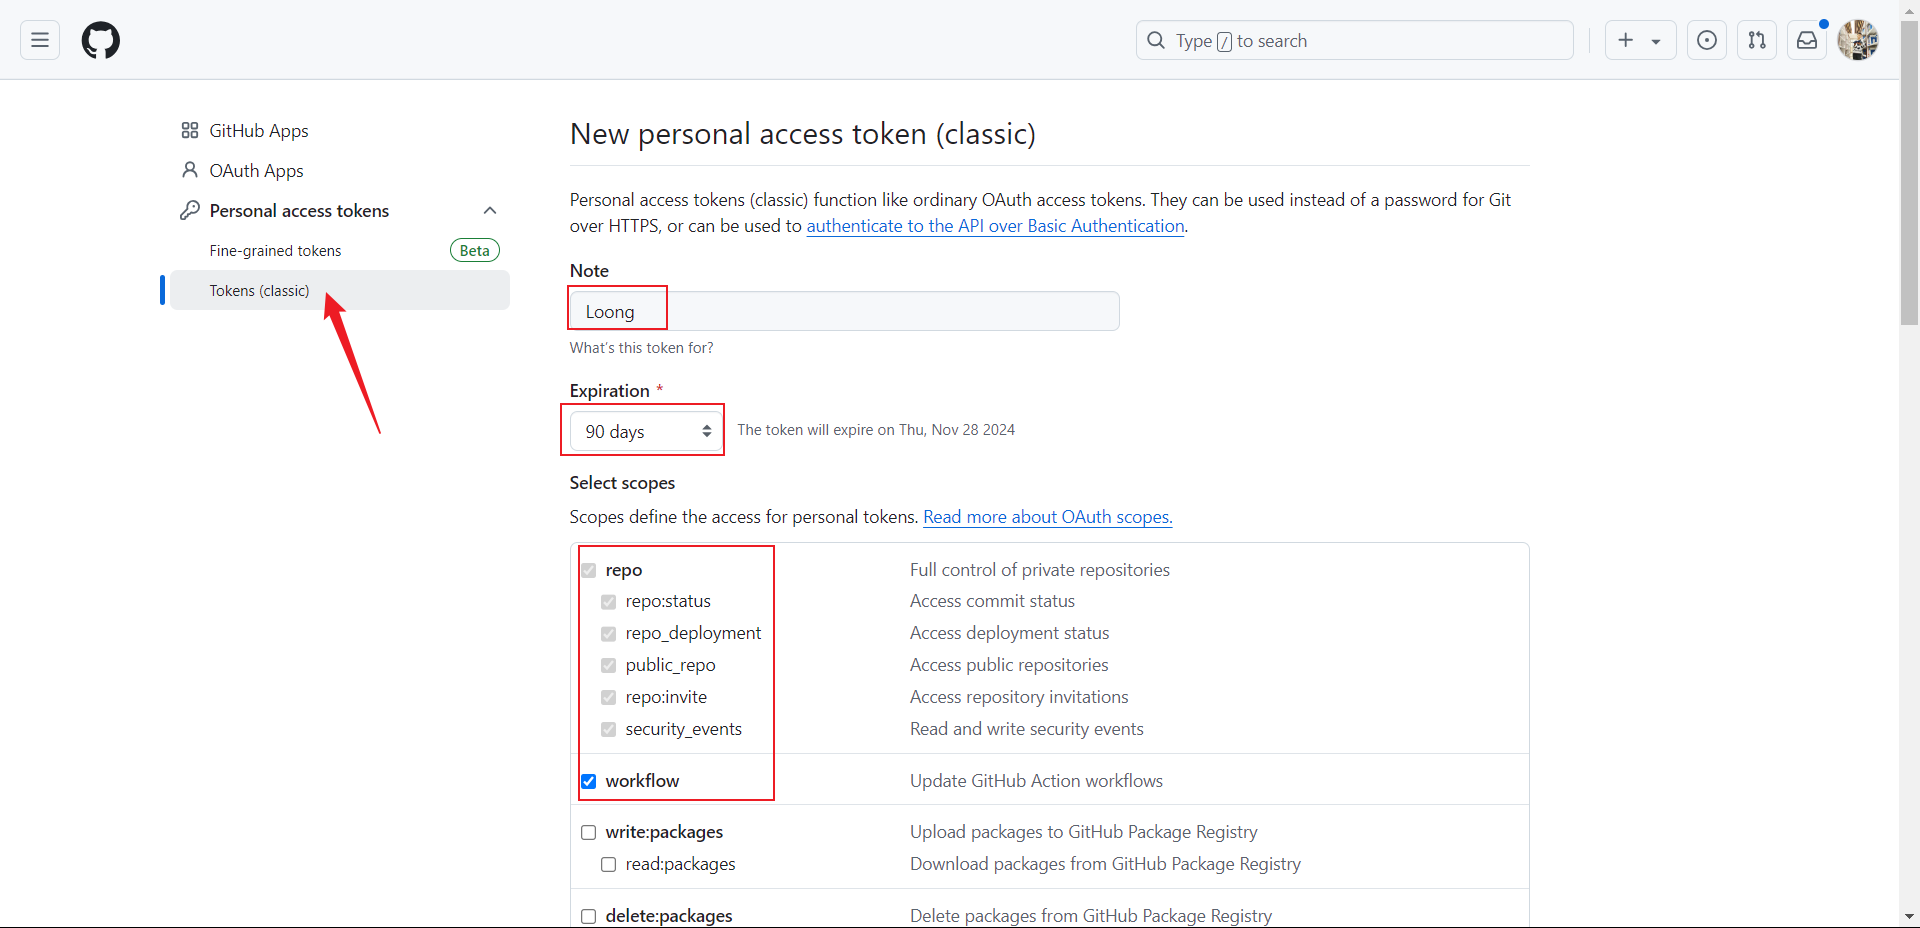
因为 GitHub API 对接口请求有限制,OAuth 方式限制太低,不足以用于初始化评论区,因此需要 Personal Access Token 的方式来完成。在这里申请一个新的 Token,网页标题为 “New personal access token (classic)”。填写如下信息:

  • Note:Token 的使用目的,例如 hexo-blog-comments-init
  • Expiration:选择 “No expiration”,也就是无过期时间。
  • Select scopes:选择 Token 的权限。这里需要以下权限:
    • repo:status
    • repo_deployment
    • public_repo

点击 “Generate token”,获取新的 Token。这里 Token 只会出现一次,请务必记下,否则又要重新创建了。
安装相关依赖

在项目根目录下运行命令:

1
npm i request xml-parser blueimp-md5 moment hexo-generator-sitemap md5 -S

配置 hexo-generator-sitemap

安装 hexo-generator-sitemap,随后在_config.yml 添加或修改:

1
2
3
sitemap:
path: sitemap.xml
template: sitemap-template.xml

在项目根目录新建文件 sitemap-template.xml

1
2
3
4
5
6
7
8
9
10
11
12
13
14
15
16
17
<?xml version="1.0" encoding="UTF-8"?>
<urlset xmlns="http://www.sitemaps.org/schemas/sitemap/0.9">
{% for post in posts %}
<url>
<loc>{{ post.permalink | uriencode }}</loc>
{% if post.updated %}
<lastmod>{{ post.updated.toISOString() }}</lastmod>
{% elif post.date %}
<lastmod>{{ post.date.toISOString() }}</lastmod>
{% endif %}
<date>{{ post.date }}</date>
<title>{{ post.title + ' | ' + config.title }}</title>
{# nunjucks 模版语法 https://github.com/mozilla/nunjucks #}
<desc>{{ post.description | default(post.excerpt) | default(post.content) | default(config.description) | striptags | truncate(200, true, '') }}</desc>
</url>
{% endfor %}
</urlset>

配置完成后使用 hexo clean & hexo g 可以看到生成了 public/sitemap.xml

添加自动初始化脚本

新建文件 source/_scripts/gitalk-auto-init.js,并写入如下内容(注意 config 中的配置信息要符合你的博客):

1
2
3
4
5
6
7
8
9
10
11
12
13
14
15
16
17
18
19
20
21
22
23
24
25
26
27
28
29
30
31
32
33
34
35
36
37
38
39
40
41
42
43
44
45
46
47
48
49
50
51
52
53
54
55
56
57
58
59
60
61
62
63
64
65
66
67
68
69
70
71
72
73
74
75
76
77
78
79
80
81
82
83
84
85
86
87
88
89
90
91
92
93
94
95
96
97
98
99
100
101
102
103
104
105
106
107
108
109
110
111
112
113
114
115
116
117
118
119
120
121
122
123
124
125
126
127
128
129
130
131
132
133
134
135
136
137
138
139
140
141
142
143
144
145
146
147
148
149
150
151
152
153
154
155
156
157
158
159
160
161
162
163
164
165
166
167
168
169
170
171
172
173
174
175
176
177
178
179
180
181
182
183
184
185
186
187
188
189
190
191
192
193
194
195
196
197
198
199
200
201
202
203
204
205
206
207
208
209
210
211
212
213
214
215
216
217
218
219
220
221
222
223
224
225
226
227
228
229
230
231
232
233
234
235
236
237
238
239
240
241
242
243
244
245
246
247
248
249
250
251
252
253
254
255
256
257
258
259
260
261
262
263
264
265
266
267
268
269
270
271
272
273
274
275
276
277
278
279
280
281
282
283
284
285
286
287
288
289
290
291
292
293
294
295
296
297
298
299
300
301
302
const fs = require('fs');
const path = require('path');
const url = require('url');

const request = require('request');
const xmlParser = require('xml-parser');
const md5 = require('md5');

// 配置信息
const config = {
username: 'xxx', // GitHub repository 所有者,可以是个人或者组织。对应Gitalk配置中的owner
repo: 'xxx', // 储存评论issue的github仓库名,仅需要仓库名字即可。对应 Gitalk配置中的repo
token: 'xxx', // 前面申请的 personal access token
sitemap: path.join(__dirname, '../../public/sitemap.xml'), // 自己站点的 sitemap 文件地址
cache: true, // 是否启用缓存,启用缓存会将已经初始化的数据写入配置的 gitalkCacheFile 文件,下一次直接通过缓存文件判断
gitalkCacheFile: path.join(__dirname, './gitalk-init-cache.json'), // 用于保存 gitalk 已经初始化的 id 列表
gitalkErrorFile: path.join(__dirname, './gitalk-init-error.json'), // 用于保存 gitalk 初始化报错的数据
};

const api = 'https://api.github.com/repos/' + config.username + '/' + config.repo + '/issues';

/**
* 读取 sitemap 文件
* 远程 sitemap 文件获取可参考 https://www.npmjs.com/package/sitemapper
*/
const sitemapXmlReader = (file) => {
try {
const data = fs.readFileSync(file, 'utf8');
const sitemap = xmlParser(data);
let ret = [];
sitemap.root.children.forEach(function (url) {
const loc = url.children.find(function (item) {
return item.name === 'loc';
});
if (!loc) {
return false;
}
const title = url.children.find(function (item) {
return item.name === 'title';
});
const desc = url.children.find(function (item) {
return item.name === 'desc';
});
const date = url.children.find(function (item) {
return item.name === 'date';
});
ret.push({
url: loc.content,
title: title.content,
desc: desc.content,
date: date.content,
});
});
return ret;
} catch (e) {
return [];
}
};

// 获取 gitalk 使用的 id
const getGitalkId = ({
url: u,
date
}) => {
const link = url.parse(u);
// 链接不存在,不需要初始化
if (!link || !link.pathname) {
return false;
}
if (!date) {
return false;
}
return md5(link.pathname);
};

/**
* 通过以请求判断是否已经初始化
* @param {string} gitalk 初始化的id
* @return {[boolean, boolean]} 第一个值表示是否出错,第二个值 false 表示没初始化, true 表示已经初始化
*/
const getIsInitByRequest = (id) => {
const options = {
headers: {
'Authorization': 'token ' + config.token,
'User-Agent': 'Mozilla/5.0 (Windows NT 10.0; Win64; x64) AppleWebKit/537.36 (KHTML, like Gecko) Chrome/67.0.3396.99 Safari/537.36',
'Accept': 'application/json'
},
url: api + '?labels=' + id + ',Gitalk',
method: 'GET'
};
return new Promise((resolve) => {
request(options, function (err, response, body) {
if (err) {
return resolve([err, false]);
}
if (response.statusCode != 200) {
return resolve([response, false]);
}
const res = JSON.parse(body);
if (res.length > 0) {
return resolve([false, true]);
}
return resolve([false, false]);
});
});
};

/**
* 通过缓存判断是否已经初始化
* @param {string} gitalk 初始化的id
* @return {boolean} false 表示没初始化, true 表示已经初始化
*/
const getIsInitByCache = (() => {
// 判断缓存文件是否存在
let gitalkCache = false;
try {
gitalkCache = require(config.gitalkCacheFile);
} catch (e) {}
return function (id) {
if (!gitalkCache) {
return false;
}
if (gitalkCache.find(({
id: itemId
}) => (itemId === id))) {
return true;
}
return false;
};
})();

// 根据缓存,判断链接是否已经初始化
// 第一个值表示是否出错,第二个值 false 表示没初始化, true 表示已经初始化
const idIsInit = async (id) => {
if (!config.cache) {
return await getIsInitByRequest(id);
}
// 如果通过缓存查询到的数据是未初始化,则再通过请求判断是否已经初始化,防止多次初始化
if (getIsInitByCache(id) === false) {
return await getIsInitByRequest(id);
}
return [false, true];
};

// 初始化
const gitalkInit = ({
url,
id,
title,
desc
}) => {
//创建issue
const reqBody = {
'title': title,
'labels': [id, 'Gitalk'],
'body': url + '\r\n\r\n' + desc
};

const options = {
headers: {
'Authorization': 'token ' + config.token,
'User-Agent': 'Mozilla/5.0 (Windows NT 10.0; Win64; x64) AppleWebKit/537.36 (KHTML, like Gecko) Chrome/67.0.3396.99 Safari/537.36',
'Accept': 'application/json',
'Content-Type': 'application/json;charset=UTF-8'
},
url: api,
body: JSON.stringify(reqBody),
method: 'POST'
};
return new Promise((resolve) => {
request(options, function (err, response, body) {
if (err) {
return resolve([err, false]);
}
if (response.statusCode != 201) {
return resolve([response, false]);
}
return resolve([false, true]);
});
});
};


/**
* 写入内容
* @param {string} fileName 文件名
* @param {string} content 内容
*/
const write = async (fileName, content, flag = 'w+') => {
return new Promise((resolve) => {
fs.open(fileName, flag, function (err, fd) {
if (err) {
resolve([err, false]);
return;
}
fs.writeFile(fd, content, function (err) {
if (err) {
resolve([err, false]);
return;
}
fs.close(fd, (err) => {
if (err) {
resolve([err, false]);
return;
}
});
resolve([false, true]);
});
});
});
};

const init = async () => {
const urls = sitemapXmlReader(config.sitemap);
// 报错的数据
const errorData = [];
// 已经初始化的数据
const initializedData = [];
// 成功初始化数据
const successData = [];
for (const item of urls) {
const {
url,
date,
title,
desc
} = item;
const id = getGitalkId({
url,
date
});
if (!id) {
console.log(`id: 生成失败 [ ${id} ] `);
errorData.push({
...item,
info: 'id 生成失败',
});
continue;
}
const [err, res] = await idIsInit(id);
if (err) {
console.log(`Error: 查询评论异常 [ ${title} ] , 信息:`, err || '无');
errorData.push({
...item,
info: '查询评论异常',
});
continue;
}
if (res === true) {
// console.log(`--- Gitalk 已经初始化 --- [ ${title} ] `);
initializedData.push({
id,
url,
title,
});
continue;
}
console.log(`Gitalk 初始化开始... [ ${title} ] `);
const [e, r] = await gitalkInit({
id,
url,
title,
desc
});
if (e || !r) {
console.log(`Error: Gitalk 初始化异常 [ ${title} ] , 信息:`, e || '无');
errorData.push({
...item,
info: '初始化异常',
});
continue;
}
successData.push({
id,
url,
title,
});
console.log(`Gitalk 初始化成功! [ ${title} ] - ${id}`);
continue;
}

console.log(''); // 空输出,用于换行
console.log('--------- 运行结果 ---------');
console.log(''); // 空输出,用于换行

if (errorData.length !== 0) {
console.log(`报错数据: ${errorData.length} 条。参考文件 ${config.gitalkErrorFile}。`);
await write(config.gitalkErrorFile, JSON.stringify(errorData, null, 2));
}

console.log(`本次成功: ${successData.length} 条。`);

// 写入缓存
if (config.cache) {
console.log(`写入缓存: ${(initializedData.length + successData.length)} 条,已初始化 ${initializedData.length} 条,本次成功: ${successData.length} 条。参考文件 ${config.gitalkCacheFile}。`);
await write(config.gitalkCacheFile, JSON.stringify(initializedData.concat(successData), null, 2));
} else {
console.log(`已初始化: ${initializedData.length} 条。`);
}
};

init();

随后在 package.json 新增:

1
2
3
4
5
6
7
"scripts": {
"build": "hexo generate && node source/_scripts/gitalk-auto-init.js",
"clean": "hexo clean",
"deploy": "hexo deploy",
"server": "hexo server",
"talk": "node source/_scripts/gitalk-auto-init.js"
},

本地运行测试

执行 hexo clean; npm run build; hexo s 进行本地部署。这里使用 npm run build 的原因是上面在 package.json 中进行了定义,使它兼具了 hexo g 与 Gitalk 批量脚本的功能。也可以不使用 npm run build 而单独执行这两条命令。

日志中应该出现如下内容:

1
2
Gitalk 初始化开始... [ xxx | xxx ]
Gitalk 初始化成功! [ xxx | xxx ] - xxxxxxxxx

这说明 Issue 评论区正在建立中。你可以去实际的评论区 GitHub 仓库里查看 Issues 是否存在来验证是否成功。

不为某些文章生成评论区

在本地测试中发现,无论文章是否具有 comments: false,都生成了对应的评论区 Issue(虽然评论区依旧是关闭的,但是 Issue 存在)。如果不想看到此类行为,则需要做一些修改。

首先修改 sitemap-template.xml,加入如下内容:

1
2
3
4
5
6
7
8
9
10
11
12
13
14
15
16
17
18
19
<?xml version="1.0" encoding="UTF-8"?>
<urlset xmlns="http://www.sitemaps.org/schemas/sitemap/0.9">
{% for post in posts %}
+ {% if post.comments %}
<url>
<loc>{{ post.permalink | uriencode }}</loc>
{% if post.updated %}
<lastmod>{{ post.updated.toISOString() }}</lastmod>
{% elif post.date %}
<lastmod>{{ post.date.toISOString() }}</lastmod>
{% endif %}
<date>{{ post.date }}</date>
<title>{{ post.title + ' | ' + config.title }}</title>
{# nunjucks 模版语法 https://github.com/mozilla/nunjucks #}
<desc>{{ post.description | default(post.excerpt) | default(post.content) | default(config.description) | striptags | truncate(200, true, '') }}</desc>
</url>
+ {% endif %}
{% endfor %}
</urlset>

这是为了在 public/sitemap.xml 生成时检测评论区是否开启,如果不开启,则直接不生成对应内容。

随后重新部署验证。可能需要清理一下已经存在的 Issues。

远程部署

最后,修改工作流的如下内容(首先需要配置博客的自动部署,详情可以参考 Hexo 静态博客指南:本站是如何诞生的(2021 年版)):

1
2
3
4
5
6
7
    # Deploy
- name: Deploy hexo
run: |
hexo clean
- hexo generate
+ npm run build
hexo deploy

随后提交代码出发自动部署即可。

Secondary rate limits 受限问题

虽然 Personal Access Token 有每日 5000 次的限制,足够使用,但仍然可能出发 GitHub 的 Secondary rate limits:

这会让远程部署报错。你可以尝试更改请求间隔来规避这个问题。示例更改代码如下:

1
2
3
4
5
6
7
8
9
10
11
12
13
14
15
16
17
18
19
20
21
22
23
24
25
26
27
28
29
30
31
32
33
34
35
36
37
38
39
40
41
42
43
44
45
46
47
48
49
50
51
52
53
54
55
56
57
58
59
60
61
62
63
64
65
66
67
68
69
70
71
72
73
// 上面省略

const getIsInitByRequest = (id) => {
const options = {
headers: {
'Authorization': 'token ' + config.token,
'User-Agent': 'Mozilla/5.0 (Windows NT 10.0; Win64; x64) AppleWebKit/537.36 (KHTML, like Gecko) Chrome/67.0.3396.99 Safari/537.36',
'Accept': 'application/json'
},
url: api + '?labels=' + id + ',Gitalk',
method: 'GET'
};
return new Promise((resolve) => {
setTimeout(() => { // 增加等待时间3000ms
request(options, function (err, response, body) {
if (err) {
return resolve([err, false]);
}
if (response.statusCode != 200) {
return resolve([response, false]);
}
const res = JSON.parse(body);
if (res.length > 0) {
return resolve([false, true]);
}
return resolve([false, false]);
});
}, 3000); // 3000ms
});
};

// 中间省略

const gitalkInit = ({
url,
id,
title,
desc
}) => {
// 创建issue
const reqBody = {
'title': title,
'labels': [id, 'Gitalk'],
'body': url + '\r\n\r\n' + desc
};

const options = {
headers: {
'Authorization': 'token ' + config.token,
'User-Agent': 'Mozilla/5.0 (Windows NT 10.0; Win64; x64) AppleWebKit/537.36 (KHTML, like Gecko) Chrome/67.0.3396.99 Safari/537.36',
'Accept': 'application/json',
'Content-Type': 'application/json;charset=UTF-8'
},
url: api,
body: JSON.stringify(reqBody),
method: 'POST'
};
return new Promise((resolve) => {
setTimeout(() => { // 增加等待时间3000ms
request(options, function (err, response, body) {
if (err) {
return resolve([err, false]);
}
if (response.statusCode != 201) {
return resolve([response, false]);
}
return resolve([false, true]);
});
}, 3000); // 3000ms
});
};

// 下面省略

之后进行重新部署测试。这可能会拉长部署时间,但只要生成了本地缓存文件就可以加速。

关于权限与安全问题的讨论

对 Gitalk 这类基于 GitHub Issues 的评论系统,权限与安全是绕不开的话题。该系统面临的主要问题如下:

  1. 对作者:client_idclient_secret 直接暴露在前端,可能会有安全隐患;
  2. 对评论者:首次使用时需要授权 GitHub 账户,而该授权竟然要求所有公开仓库的读写权限,权限过于夸张,如果有恶意网站,甚至可以删光所有公共仓库。

关于第一点,这里有详细讨论。也有 Issue 针对这个问题做了说明,简要概括如下:

  1. 虽然 Gitalk 使用了第三方代理服务器来获取 access_token 属于违反 OAuth2.0 规范,但是作为一个评论系统来说安全性可以不必担心,因为 GitHub 已经对 access_token 做了只读限制;
  2. 获取或修改 GitHub 用户数据,需要 token,为了拿到 token,除了需要 OAuth App 的 client_idclient_secret 外,还需要一个 Authorization Code;
  3. 这个 code 是 GitHub 登录授权完成时,在跳转回 redirect_uri 的查询参数拿到的, redirect_uri 必须是在 OAuth App 配置的 callback URL 域名下;
  4. 这样即使别人用了你的 client_idclient_secret ,跳转之后也拿不到 code,所以,有 client_idclient_secret 也做不了什么。

虽然如此,而且作为静态博客引擎,这样做是没有办法的办法,但是暴露 client_idclient_secret 终究是不太推荐的做法。

对于第二点,讨论更为广泛,Issue帖子都有涉及。为什么需要这么高的权限,简而言之就是 GitHub OAuth 权限设计目前只能做到这样的粒度。Gitalk 源码中,开发者没有保存 access_token,只是将它保存到了 localStorage 中。但是可能会存在恶意的攻击者来扩展这一点。这对于评论者而言是一种伤害,如此之大的权限可能会降低评论者评论的意愿,毕竟网站有无恶意是很难判断的。目前的解决方案有两种:

  1. 点击评论区的统计数字,可以跳转到相应的 GitHub Issue 页面,在页面评论可以绕过验证;
  2. 采用更安全的评论系统,例如 utterances 这类 App,它的权限仅限于某个仓库,可以一定程度上降低破坏性。

那么本博客该如何做?本着精益求精的原则,估计是又要迁移到 utterances 上了…… 刚刚迁移评论系统还没多久,就发现了这个问题。生命在于折腾,utterances 迁移会后续写文章处理。